Looking for help?
Find answers to your questions
- ACC-C51
- Charge 33
- Charge X20
- Charge C84
- Charge X33
- Charge R65
- Charge i36
- ATA 04
- ATA 02
- ATA 03
- Charge Hub 65
- Charge 70
- Charge C60
- Aerosync Duo User Manual
- AerosynQ Trio 2 User Manual
- AerosynQ B User Manual
- AerosynQ S2 User Manual
- AerosynQ S1 User Manual
- C85R User Manual
- C85 User Manual
- C51 User Manual
- AerosynQ User Manual
- Charge i45 User Manual
- Charge 100 User Manual
- RAAP H100 User Manual
- RAAP G150 User Manual
- RAAP i20 User Manual
- MRS-11
- RAAP C38 User Manual
- Aerosync Trio User Manual
- RAAP G65 User Manual
- Car Connect
- PowerPod Pro User Manual
- PowerPod User Manual
- Aerosync Tripad User Manual
- PP-129T
- Pocket 5
- MiniCharge 11 User Manual
- Powermini 10 User Manual
- AerosynQ Magsurge User Manual
- PowerMini 20 User Manual
- Maglite/ PB 21
- PB 5A
- Xtreme 20K
- Xtreme 10K
- Stylo N20 User Manual
- Loop 10
- Aerosync PB 5A
- Stylo N10 User Manual
- Powerlit Duo 30 User Manual
- Pocket Charge
- Aerosync Mount User Manual
- MiniCharge 20 User Manual
- Force 20K
- Solar 10K User Manual
- Aerosync 65 User Manual
- Aerosync Snap/WLP-12
- Aerosync PB11 User Manual
- Powerlit Duo 30 User Manual
- Aerosync PB Prime User Manual
- Line 20 User Manual
- Line 10 User Manual
- Aerosync PB 12
- Stylo 20K
- Powerlit 45 User Manual
- Aerosync Quad User Manual
- Aerosync PB5
- Powerlit XL Lite User Manual
- Force 10K User Manual
- Powerlit Ultra Lite User Manual
- PP-124
- Stylo Pro User Manual
- Powerlit Boost User Manual
- Stylo 10K
- Powerhub 200 User Manual
- Common User Manual
- Powerlit Ultra
- Stylo Max
- Aerosync PB 10 User Manual
Wise Crest User Manual
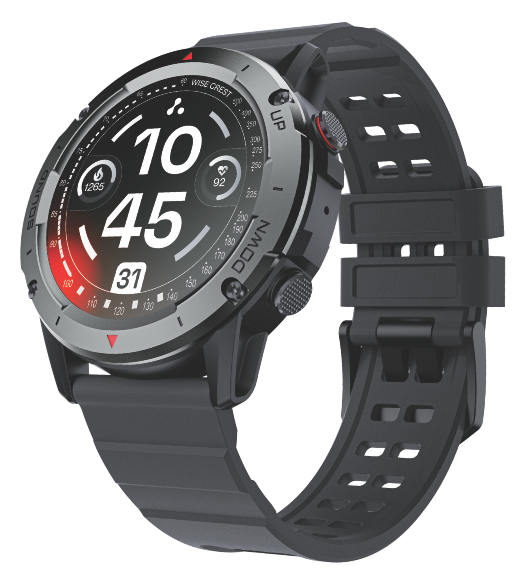
Welcome
Thank you for purchasing the Ambrane Wise Crest smartwatch. We recommend you to read the instructions manual carefully before using the product.
Package Contents
- 1N Ambrane Wise Crest
- 1N User Manual Scan Card
- 1N USB Magnetic Charging Cable
- 1N FAQ Card
- 1N Rating Card
Product Overview

Turning the Watch ON
To turn the watch on, press the key on the right side of the watch for 4 to 5 seconds.
NOTE: The smartwatch must be charged before initial use.
You can wake the screen by lifting your wrist. Enable the Quick View feature on the app to function.
Charging the Watch
- Turn the watch over, align and attach the charging pins to the magnet gold prongs.
- You will see the charging icon on the watch screen after 5 seconds.
- Complete charging may take up to 2 hours. The battery icon would change to full once the charging is complete.
- Please clean the charging points before charging to avoid erosion of the gold prongs and other risks.
Start Using the Smartwatch
While operating the smartwatch for the first time, there are two ways to start:
- Using the QR Code
After turning ON the smartwatch for the first time, it shows the QR code on its screen. Simply scan the code using your smartphone and it will download the “FitCloudPro” app on your smartphone to start using the smartwatch.

- Manually Download and Install the App by the name of “FitCloudPro”.
You can set up the Smartwatch through the “FitCloudPro” app for iOS or Android devices. Or just scan this QR code from your smartwatch to get FitCloudPro in your app store.
Pairing Instructions
- Turn on Bluetooth on your smartphone.
- After installing the FitCloudPro app on your smartphone, register and log into your account as per the instructions on the screen.
- Ensure that the smartwatch and smartphone are kept near each other.
- Continue following the onscreen instructions to connect or pair your smartwatch to your smartphone.
Open App > Device > Add a new device > Choose Wise Crest.
- Select the Bluetooth name Wise Crest from the list. The watch will show a pairing notification, click on to confirm pairing.
Note: The device should have at least android 6+ or iOS 10.0+ and above. The watch can only be paired with one smartphone at a time. To pair any other smartphone, please unbind the currently connected smartphone before pairing.
Pairing Instructions for Bluetooth Calling
- For most Android smartphones, after the watch is connected to the app correctly, there will be a “Pair” pop-up reminder, choose to pair. The connection would be successfully completed.
- For all iOS mobile phones and a few Android smartphones, after the watch is connected to the app correctly, go to the Settings page of your smartphone, search and select “Crest Phone” in your Bluetooth list, and then click to pair. The Bluetooth Call feature can be used after being successfully paired.
Tips:
- Please upgrade the app to the latest version to get a better experience.
- For the first time connection with an iPhone, a “Pair” reminder will pop up. Click to pair, then incoming calls and instant messages will be pushed.
- For the first time connection with Android, a “Permissions” reminder will pop up, please follow up on the guidance and allow permissions to ensure all functions working properly.
- To connect successfully, please turn ON the smartphone’s Bluetooth, GPS and network.
- If the device cannot be searched or connected during use, please reset or turn OFF the watch to try again.
Synchronize Data
In daily wear, the watch can detect and record all kinds of data. The user needs to connect the smartwatch with Bluetooth on the app and enable it to synchronize.
Note: To prevent data loss, please synchronize the watch at least once every 7 days.
Watch Faces
Your Ambrane Wise Crest comes with 100+ watch faces for you to choose from. Once you pick your favourite watch face, your home screen will display the date, time, week, weather, steps you take, battery status and connection status. Long press the screen, swipe to choose and click to confirm.
Custom Watch Face: Open the app> Go to Device> Click on Watchface. Now, choose your desired watch face by clicking on the first watch face and then click on the “Sync Watchface” button to apply.
Steps, Distance & Calorie Monitor

You can view daily records of steps, distance and calories on the app as well as on your smartwatch. The data will be cleared at the end of every day.
NOTE: All records will be available on the app if you keep it synchronized.
Replace the Watch Dial

Long press the main page for 3 seconds to enter the watch dial replacement page. Or download the replacement dial on the app.
Control Centre

Slide down to enter the control centre. There are: Do not disturb mode; Brightness Adjustment; Settings; Find my phone; System; Shutdown and Setting.
Brightness Adjustment

Slide down to the control centre and click the brightness adjustment icon to adjust the brightness of your device.
Do Not Disturb Mode

Slide down to the control centre and click the Do not disturb icon to confirm that the do not disturb mode is on.
Find My Phone
Slide down to the control centre, click the Find my Phone icon, and your phone will vibrate to alert you.
System

Slide down to the control centre and click system to view the system version.
Settings

Slide down to the control centre and click the settings icon to enter the function setting.
Information

Slide up to the control centre, click the audio icon, and open audio mode.
Sports Data
Slide once to the left to the sports data page, view the sports data, and record steps, calories, and kilometres separately.
Heart Rate

Slide twice to the left to the heart rate page, start measuring and show the data.
Call Function

This function needs to be connected to audio Bluetooth. When entering the dial, you can enter the phone number and call as needed; long press on the keyboard 7 and 9 to enter *and #
Sports Modes

Slide right to enter the list function, click to enter the sports mode and select your preferred sports mode.
Weather

Slide right to enter the list function, click the weather icon and view the weather.
Music Control

Slide right to enter the list function, and click to enter the music control to adjust the upper and lower song titles.
Cleaning and Maintenance
- Keep the product clean.
- Keep the product dry.
- Do not wear it too tight.
- Do not use household cleaners to clean the watch. Use a soap-free detergent if you need to clean it.
Safety and Product Information Notes
Battery Warning:
Do not disassemble, pierce or damage the battery. Do not disassemble the built-in batteries of non-replaceable battery devices. Do not use sharp objects to remove the battery.
Health Warning:
The watch's optical heart rate sensor glows green and ashes. If you suffer from epilepsy or are sensitive to blinking light sources, please consult your physician to affirm if you can wear this product.
The device tracks your daily activities through sensors. These data are intended to tell you about your daily activities, such as steps, sleep, distance, heart rate and calories, but may not be completely accurate.
The device, accessories, heart rate sensors and other relevant data are designed for entertainment and fitness, not for medical purposes. They are not applicable to the diagnosis, monitoring, treatment or prevention of any diseases or symptoms. The heart rate data is for reference only. We are not responsible for any consequences caused by any data deviation.
Matters Needing Attention
- Watch data needs to be kept once every 7 days to avoid data loss.
- The watch has no waterproof effect on seawater, acidic and alkaline solutions, chemical reagents and other corrosive liquids.
- The damage or defects caused by misuse or improper use are not covered by the warranty.
- Avoid wearing the watch too tight in daily use. Please keep the parts of the watch touching the skin dry.
- When your heart rate is measured, keep your arm still during the test.
Caution
RISK OF EXPLOSION IF BATTERY IS REPLACED BY AN INCORRECT TYPE
DISPOSE OF USED BATTERIES ACCORDING TO THE INSTRUCTIONS
Old electrical appliances must not be disposed of together with the residual waste, but have to be disposed of separately. The disposal at the communal collecting point via private persons is free. The owner of old appliances is responsible to bring the appliances to these collection points or to similar collection points. With this little personal effort, you contribute to recycling valuable raw materials and the treatment of toxic substances.
Warranty
- This smartwatch comes under a warranty of 365 days against any manufacturing-related issues.
- The accessories (magnetic pin charging cable) which come along with the smartwatch come under a warranty of 90 days.
- The wear-and-tear accessories such as the straps are not covered under warranty.
Updated on 02 Dec 2025
What are your Feelings?
Thanks for your feedback.
- Choosing a selection results in a full page refresh.